- Navigate to the site containing the library for which you want to create a file.
- Click the name of the library on the Quick Launch, or click the top-right gear icon, click Site contents, then under lists, libraries, and other apps, click the name of the library.
- In the ribbon, click the Files tab, and then in the New group, click New Document.
- Add the information that you want to your file.
- Save the file as you normally do by clicking the Save button or command in the application, and then naming your file.
If you are saving a file to a library that requires files to be checked out, the file is initially checked out to you. You must check in the file before other people can edit it.
Depending on how your library is set up, you may be prompted for additional information about the file when you save it. For example, you may be asked to choose the content type of the file or enter more details about the file. - The file is added to the library and should appear in the list of files. If you do not see your files in the library right away, refresh the browser.

If additional templates are associated with your library, other choices appear, such as New Worksheet or New Contract.
Usually, a security message displays, and after you click OK, a file is created based on the template associated with the command.
Note: If you want to upload a file that has the same file name as an existing file in the library, and you don’t want to replace or add a new version of the existing file, you must rename one of the duplicate files.
- Navigate to the site containing the library for which you want to upload a file.
- Click the name of the library on the Quick Launch, or click the top-right gear icon, click Site contents, then under lists, libraries, and other apps, click the name of the library.
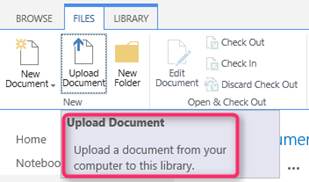
- In the Ribbon, click the Files tab, and then in the New group, click Upload Document.
- In the Upload Document dialog box, click Browse to find the file that you want to add, select the file, and then click Open.
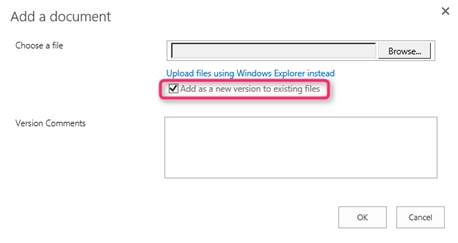
- If you are uploading a revised version of an existing file, do one of the following:
Library not configured to track file versions You can replace the existing file with the revised file. In the Upload Document section, select the Overwrite existing files check box.

Library configured to track file versions You can replace the existing file with the new version as part of the document history. In the Upload Document section, select the Add as a new version to existing files check box. - Click OK.
If a form appears that requests more information about the file, enter the information into the boxes, such as the title. A red asterisk appears next to the name of each box that requires information. Different boxes may appear, depending on how your library is set up and whether your library requires custom properties.
If you are uploading a file to a library that requires certain file properties to be filled out, and those properties are missing, the file remains checked out to you. When you fill out the required properties, you can check in the file.
If you are uploading a file to a library that requires files to be checked out, the file is initially checked out to you. You must check in the file before other people can edit it. - The file is added to the library and should appear in the list of files. If you do not see your files in the library right away, refresh the browser.

- Navigate to the site containing the library for which you want to upload files.
- Click the name of the library on the Quick Launch, or click the top-right gear icon, click Site contents, then under lists, libraries, and other apps, click the name of the library.
- From a Windows Explorer window opened to the folder containing the files you want to upload, drag and drop the selected files to the library as shown below.

If you are uploading files to a library that requires certain file properties to be filled out, and those properties are missing, the files remain checked out to you. When you fill out the required properties, you can check in the files.
If you are uploading files to a library that requires files to be checked out, the files are initially checked out to you. You need to check the files in before other people can edit them. - The files are added to the library and should appear in the list of files. If you do not see your files in the library right away, refresh the browser.
Note: Be careful when you delete files. Deleting files may be permanent and you may not be able to recover them. Consider moving or archiving the files instead. Depending on how your site was configured, you may be able to recover the files and its contents from the Recycle Bin.
- Navigate to the site containing the library for which you want to delete files.
- Click the name of the library on the Quick Launch, or click the top-right gear icon, click Site contents, then under lists, libraries, and other apps, click the name of the library.
- Make sure the files are not checked out by refreshing the browser and noting the icon before the name column. If one or more files are checked out, those files must be checked back in by the person who checked them out.
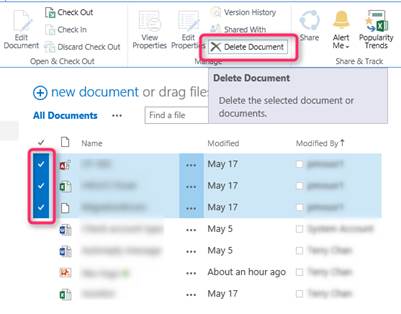
- For each file on the page that you want to delete, hover over the item, and then click to check the item.
- In the Ribbon, click Files tab, and then in the Manage group, click Delete Document.
Tip: Consider using Datasheet view to delete multiple items, especially when the items may not display on one page in Standard view.
Navigate to the site containing the library for which you want to open a file.
- Click the name of the library on the Quick Launch, or click the top-right gear icon, click Site contents, then under lists, libraries, and other apps, click the name of the library.
- Click the name of the item in the Name column to open the document in browser.
- Navigate to the site containing the library for which you want to open a file.
- Click the name of the library on the Quick Launch, or click the top-right gear icon, click Site contents, then under lists, libraries, and other apps, click the name of the library.
- Select the file by hovering over the file, and then click to select. Make sure that only one file is selected in the list of files on the page.
- In the Ribbon, click the Files tab, and then in the Open & Check Out group, click Edit Document.
- Do one of the following:
Check out is not required- A message appears and asks whether you think the file is safe to open or it. If you want to proceed, click Yes.

Check out is required- If the program is compatible with SharePoint technologies, such as Word 2013, the file will be opened in the program. Click Check Out in order to edit the document.
- Edit the file, save the file, and then optionally close the program.
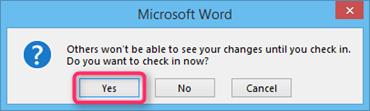
- If you have checked out the document, when you close the program, it will remind you to check-in the document so that others can see your changes. Click “Yes” button and enter your version comment to check-in the document.

- Navigate to the site containing the library for which you want to open a file.
- Click the name of the library on the Quick Launch, or click the top-right gear icon, click Site contents, then under lists, libraries, and other apps, click the name of the library.
- Select the file by hovering over the file and then click to select it. Make sure that only one file is selected in the list of files on the page.
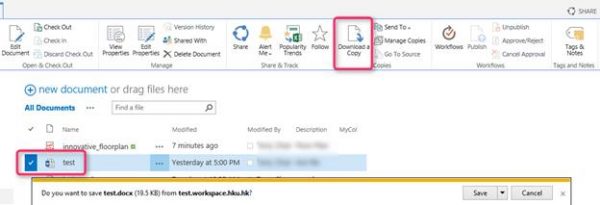
- In the Ribbon, click the Files tab, and then in the Copies group, click Download a Copy.
- In the File Download bar, click Save to save to download to the default Download folder or click Save as to select another folder.
- After the file is downloaded, click Open to open the file directly or click Open folder to open the folder in which the file is downloaded.
- When you are done editing or working with the file, upload the file back to the library.

- Click on the filename to view the file directly in web browser or Click Edit Document to edit the file in the corresponding client application.

- Or click the … beside the file to open the pop-up menu. Click Edit to edit the file in the corresponding client application. Click … and then View in Browser or Edit in Browser to work with the browser.

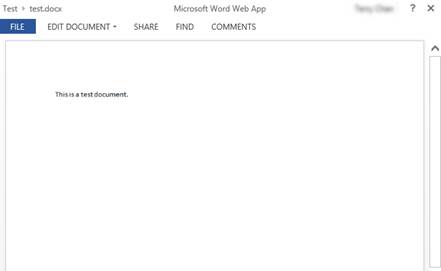
- To view the document in the browser, click View in Brower, then the Office Web Apps opens the document as view-only:

- To edit the document in the browser, click Edit in Browser, then the Office Web Apps opens the document in edit-mode:

Note: If check-out is required for the library, you need to check-out the document first before editing in the browser.
For details, please refer to:
- Microsoft website
- What’s new for Outlook Web App in Exchange 2013 here
- Navigate to the source site (e.g. https://.workspace.hku.hk/sites/source/) containing the library for which you want to copy or move files.
- Click the name of the library on the Quick Launch, or click the top-right gear icon, click Site contents, then under lists, libraries, and other apps, click the name of the library.
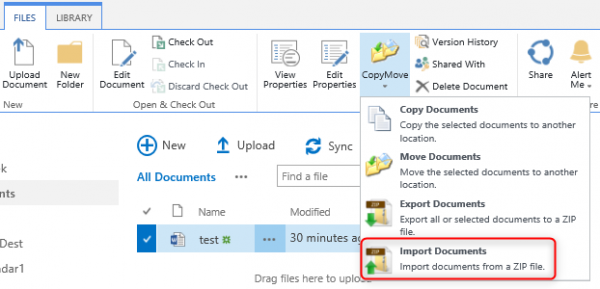
- Select the files or folders to be copied or moved. In the ribbon, click the Files tab, and then in the Manage group, click CopyMove.

- In the dropdown menu, click Copy Documents or Move Documents to copy or move document respectively. In the dialog box, select the destination path and check the boxes for Authors and dates, Version history, Item permissions to be included and then click Copy.

- In the completed dialog, click Close or Go to destination to open the destination folder.

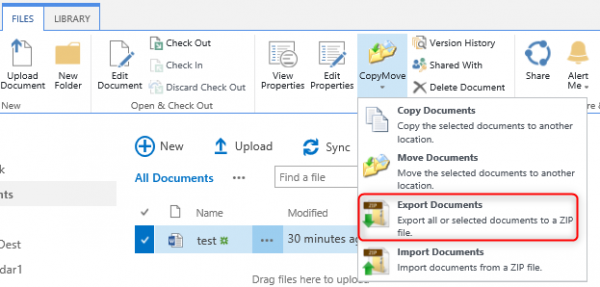
- Select the files or folders to be exported. In the ribbon, click the Files tab, and then in the Manage group, click CopyMove.
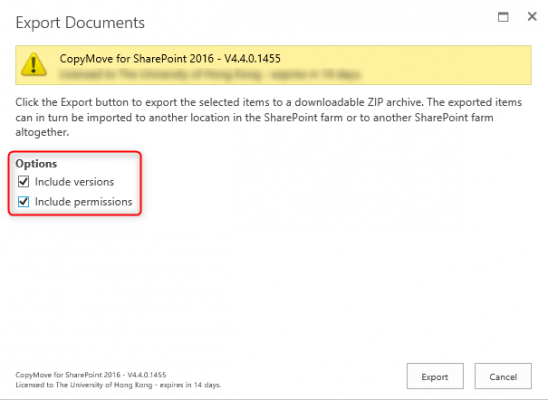
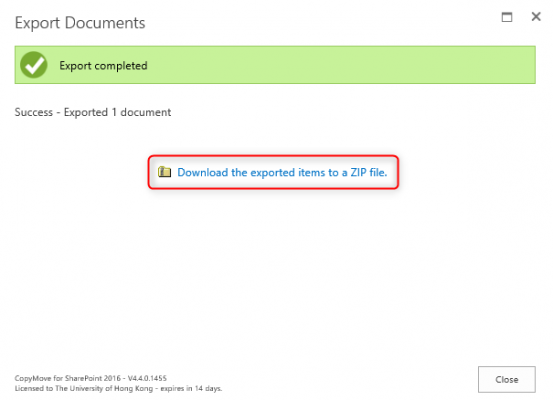
- In the dropdown menu, click Export Documents to export all or selected documents to a zip file. In the export documents dialog, check the boxes for versions and permissions to be included and then click Export.
- Click the link Download the exported items to a ZIP file to download and save the zip file.
- In the ribbon, click the Files tab, and then in the Manage group, click CopyMove.
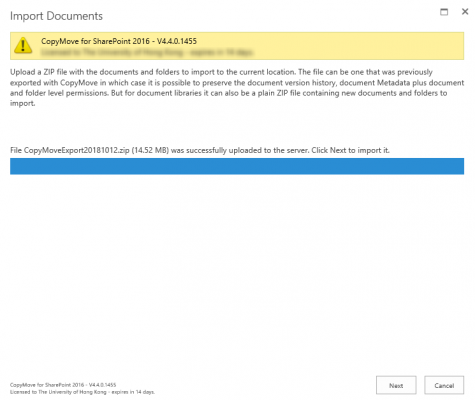
- In the dropdown menu, click Import Documents to import documents from a zip file. In the import documents dialog, browse to the zip file for upload and then click Next.
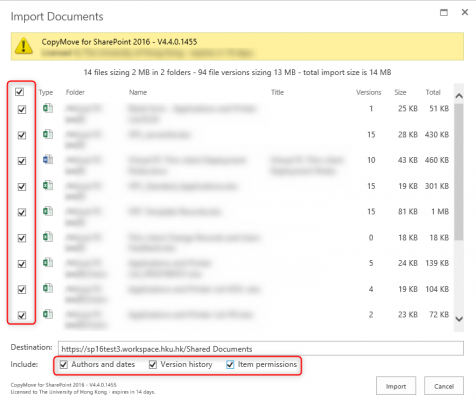
- Change the selection of the documents to be imported and check the boxes for Authors and dates, Version history, Item permissions to be included and then click Import.
- In the completed dialog, click Close.

- Navigate to the site containing the library for which you want to view the file or folder information.
- Click the name of the library on the Quick Launch, or click the top-right gear icon, click Site contents, then under lists, libraries, and other apps, click the name of the library.
- Click to select the file or folder name and then on the Files tab menu, click View Properties.


When you finish viewing the properties, click Close to return to the library.
- Navigate to the site containing the library for which you want to edit the file or folder information.
- Click the name of the library on the Quick Launch, or click the top-right gear icon, click Site contents, then under lists, libraries, and other apps, click the name of the library.
- Click to select the file or folder name and then on the Files tab menu, click Edit Properties.


Note: Depending on the list or library settings, you may be required to check-out a file before you can modify the properties. - Change the information that you want.
- When you finish editing the properties, click Save to return to the library.
- Navigate to the site containing the library or list for which you want to e-mail the link.
- Click the name of the library or list on the Quick Launch, or click the top-right gear icon, click Site contents, then under lists, libraries, and other apps, click the name of the library or list.
- Do one of the following:
- For a library, do the following:
– Select the library file.
– Click the Library tab and then in the Share & Track group, click Email a link.

- For a list, do the following:
– Click the List tab, and then in the Share & Track group, click Email a link.
- For a library, do the following:
Note: If you are working in a list, there is no need to select an item because the link that is created is for the entire list.
In the e-mail message, enter a username or distribution list, and then send the message.
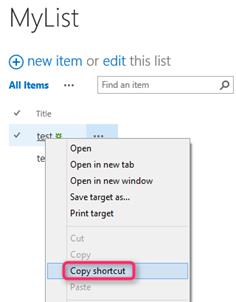
- Navigate to the site containing the library or list for which you want to copy the link.
- Click the name of the library or list on the Quick Launch, or click the top-right gear icon, click Site contents, then under lists, libraries, and other apps, click the name of the library or list.
- Select the library file or list item.
- Right-click the file name or item Title, and then click Copy shortcut.
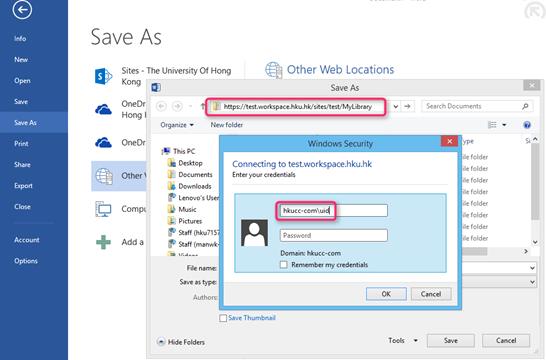
- Create or open the Microsoft Office document, for instance, Microsoft Word document
- On the top menu bar, select File > Save As
- Under Save As, choose Other Web Location and then click Browse.
- In the Save As dialog box, enter the URL of the SharePoint library. Enter your credential in the login prompt and click OK.
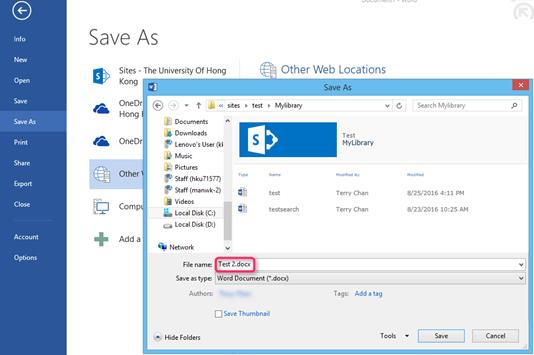
- Enter the name of the file and click Save.
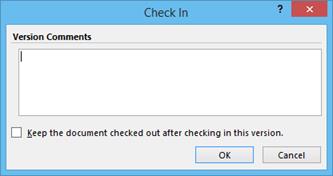
- If Document Library requires the file to be check-in, click Check in button. Enter the version comments and click OK.
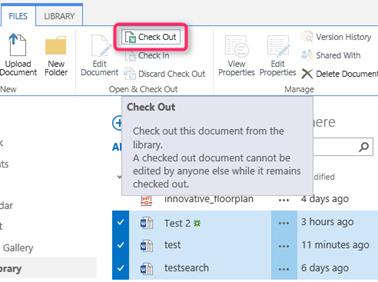
To check out a file from a library:
- Navigate to the library where your file resides.
- Choose one of the following methods of checking out the file:
– Point to the file name, click … to show the pop-up in which click … and select Check Out.
– Select the check box next to the file name and, on the Files tab, select the Check Out icon.
- When the file is checked out, the icon next to the file name is partially covered by a green, downward-pointing arrow
 . This tells you, or anyone else, that the file is checked out. If you hover over the icon of any checked-out file, a tool tip displays the name of the document and the name of the person who has it checked out.
Your files, and any changes you have made to them, will not be available to your colleagues until you check them back into your library.
To check in a file
- Navigate to the library where your file resides.
- Choose one of the following methods for checking your file back in:
- Point to the file that you want to check in, click … to show the pop-up in which click … and then select Check In.

- Select the check box next to the file icon and then, on Files tab, click Check In.

- When the Check in message box opens, make the appropriate selection in the Retain Check Out area.
- If you want to do an interim check-in and then continue working on the file, select Yes in the Retain Check Out area.
- If you are finished with your work on the file and do not need to keep it checked out, select No in the Retain Check Out area.

- In the Comments area, add a comment that describes the changes you made
- Click OK to finish checking in the file or Cancel if you change your mind for some reason. The green arrow disappears from the file icon when the file is checked back in.
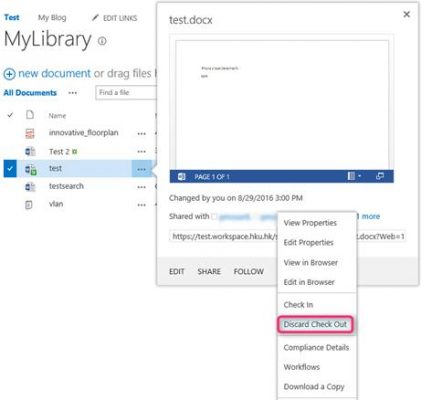
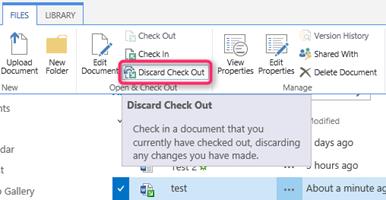
To discard a check-out:
- Navigate to the library where your file resides.
- Choose one of the following methods for checking your file back in:
- Point to the file that you want to check in, click … to show the pop-up in which click … and then select Discard Check Out.
- Select the check box next to the file icon and then, on the Files tab, click Discard Check Out.
- When the message box announces that you are about to discard the file, click OK to finish checking in the file or Cancel if you change your mind. The green arrow disappears from the file icon when the file is checked back in.
To check out, check in, or undo checkout of several files at the same time:
- Select the check box next to the file icon for each file you want to check in, check out, or discard.
- On the ribbon, select Check Out, Check In, or Discard Check Out, as appropriate.
- Click OK when the message box appears.
- Navigate to the list or library that contains the item or file you want to explore.
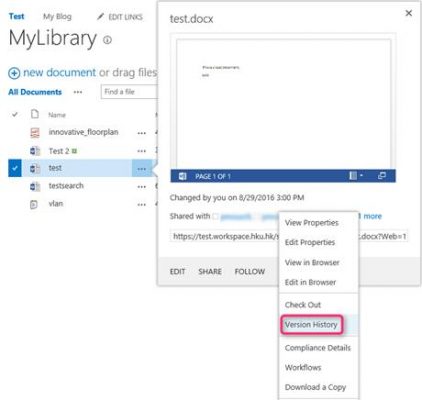
Hover over the item or file for which you want to view the history, click … to show the pop-up in which click … and select Version History from the drop-down list. - The Version History dialog box opens. Note: If you do not see the Version History command, your list or library may not be tracking versions. For more information, contact your site collection administrator to enable the versioning for the document library.
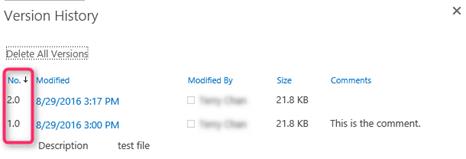
- To view a particular version of a file, look at the time and date listings in the Modified column of the Version History dialog box and click the one that interests you. The item or file opens up in a separate window where you can view it.
- Close the item or file when you have finished viewing it.
- To return to your list or library, close the Version History dialog box.