To create a blog, you must be one of a site owner.
- Click the gear icon in the top right corner and select Site contents in the drop-down menu.

- In Subsites, click new subsite.


- In the Title box, type a name for your blog site.
The title appears in the navigation for every page in the site, such as the top link bar. - In the URL name box, type the last part of the Web address that you want to use for your blog site.
- Select Blog for the template.
- Select Yes to use the top link bar from the parent site and click Create.


Optionally, if you require any post to be approved before publishing to the blog. Please follow the steps below. - After the blog site is created, go to Site contents, click Posts.
- Click the LIST tab and then List Settings.
- Click Versioning settings, select Yes for Require cotent approval for submitted items.
2.1 Determine inheritance for a blog
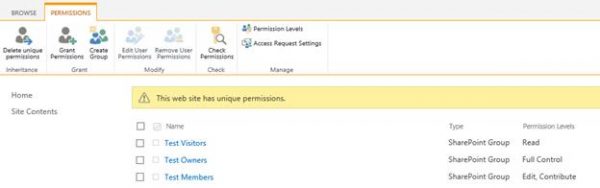
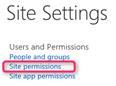
If the site owner has not already determined how inheritance is handled for the blog, or if the owner set the blog up to inherit permissions from the parent site, you can change the original setup by either breaking inheritance or changing permissions on the parent site. To change current inheritance settings:- In the top right corner, click the gear icon and select Site settings in the drop-down menu.
- Under Users and Permissions, select Site permissions. The Permission page opens. It lists all the individuals and groups who have any kind of permission to the site and what levels of permissions they have.


- Determine whether or not you want to set unique permissions for the site.
- If you want to set unique permissions, you must break inheritance. Select Stop Inheriting Permissions
Click OK to continue or, if you change your mind, click Cancel.When you break inheritance from a parent site, the item that has the new, unique permissions simply has a copy of the permissions on the parent site. You can then edit those permissions without affecting permissions on the parent site. This is especially useful for a blog because you may want to create different types of permissions for different individuals and groups and not disturb the existing permissions that apply to parent site and its other subsites.
- If you want to maintain inheritance but change certain permissions on the parent site, select Manage Parent
 from the ribbon. A new Edit menu opens, providing you with the opportunity to create new groups, grant or change permissions, manage permission levels, manage access requests, and some other actions.
- If you want to set unique permissions, you must break inheritance. Select Stop Inheriting Permissions

2.2 Set site permissions for blog participants
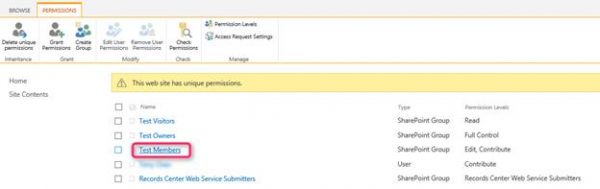
If you or the site owner established unique permissions for your blog, you can then set up or modify permissions for the participants in your blog. To do this:- In the top right corner, click the gear icon and select Site settings in the drop-down menu.
- Under Users and Permissions, select Site permissions. The Permission Tools page opens. It lists all the individuals and groups who have any kind of permission to the site and what levels of permissions they have.
- Select the name of the group for which you want to set or change permissions.
- Click the Settings menu drop-down arrow near the top of the page and select Group Settings.

The Change Group Settings dialog box opens.

- View the information that is currently on the page and enter or make any necessary changes in the following sections:
- Name and About Me Description. If you want to add or change a name, enter the new name in the Name box. Use the About Me box to add or change to the description of the group. Write a clear description that helps your users understand the purpose of the group.
- Owner. Enter the owner in the Group owner box.
- Group Settings. This section contains two questions: – Who can view the membership of the group? Select either Group Members or Everyone, whichever is more appropriate for your blog. – Who can edit the membership of the group? Select either Group Owner or Group Members. In most cases, it is better to select Group Owner.
- Click OK to complete your work on this page and close the dialog box. Note: You can also use the Change Group Settings dialog box to delete a group if it is no longer relevant. To do so, click the Delete button at the bottom of the dialog box.


2.3 Add users to a group
If groups are already set up and you just want to add a user to a specific group, take the following steps to grant the necessary permissions:- Go to Site settings. Under Users and Permissions, select Site permissions. The Permission page opens. A list of all existing groups, with the permission level of each, is displayed.
- Select the name of the group to which you want to add a user.
- On the New drop-down menu, select Add Users.
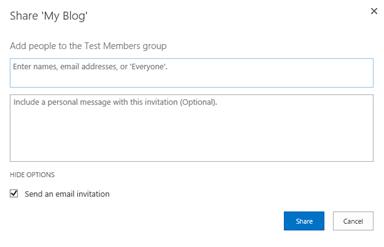
The Share dialog box opens.
- In the Add people to the group box, enter the name of each user that you want to add, separating the names by semicolons.
- Click Show OPTIONS to show the Send an email invitation check box. Uncheck it if you don’t want to send an email invitation.
- Create an appropriate message in the personal message box and then click OK.

2.4 Remove users from a group
- Go to Site settings. Under Users and Permissions, select Site permissions. The Permission page opens. A list of all existing groups, with the permission level of each, is displayed.
- Select the name of the group from which you want to remove a user.
- On the Actions menu, click Remove Users from Group.
A message pops up, asking you to confirm that you want to remove the member from the group.
- Click OK to remove the user from the group, or Cancel if you decide against it.