
1. Introduction to passkey
This guide is intended for HKU staff, students and graduates who would like to create and use Passkey for Microsoft 365 sign-in. This guide explains how to register a Microsoft Entra ID passkey for your HKU Entra ID account (including @hku.hk for staff, @connect.hku.hk for students or Connect Graduate accounts, and @graduate.hku.hk for graduate accounts) with either the registration campaign method or opt-in method. It covers how to register the passkey in the Microsoft Authenticator app and how to use it for password-less sign-in to Microsoft services including M365.
1.1 What is a passkey?
A passkey is a modern and more secure way to sign into your account without using a password & SMS One-Time Passcode (OTP) or Voice authentication OTP. Instead of remembering and typing a password, you can sign in using your fingerprint, face recognition, or device PIN. Your passkey is stored securely on your device and helps protect your account from phishing attacks and password theft.
Passkey is also a FIDO2-based, phishing-resistant credential that replaces your password and receiving SMS/Voice OTP authentication. It consists of a private key (stored securely on your device) and a public key (registered with Entra ID). You authenticate to your device using biometrics (fingerprint, face) or device PIN.
With a passkey, signing in process having following benefits:
✓ Faster sign-in
✓ No need to remember passwords
✓ Better protection against phishing attacks
✓ More secure than traditional passwords
Think of a passkey as a digital key that proves it is really you when accessing your account.
1.2 Prerequisites of using HKU account passkey
- Your HKU Entra ID account (@hku.hk, @connect.hku.hk, @graduate.hku.hk or others)
- Microsoft Authenticator app is installed and updated to latest version at your smartphone
- Your smartphone has screen lock enabled (PIN, Face ID, Touch ID, Fingerprint etc.) and Bluetooth is enabled when using passkey from another device
- Smartphone with internet access and Bluetooth connectivity (iPhone minimum version: iOS v17, Android minimum v9 and preferable to have v14+)
1.3 What will be the available sign-in options to HKU accounts?
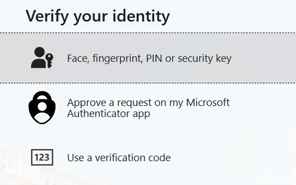
As the SMS and voice authentication sign-in methods will be terminated starting from February 2027, there will be only three sign-in methods left for HKU accounts for staff and students in long term.
| Sign-in option interface | Sign-in options |
|---|---|
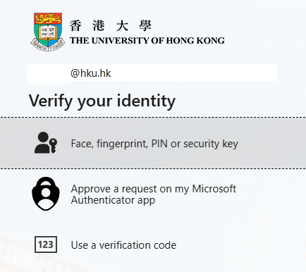 | 1. Face, fingerprint, PIN or security key (Default): Passkey Passkey is default sign-in method either stored in Microsoft Authenticator App or alternative passkey providers. |
| 2. Approve a request on my Microsoft Authenticator App: Password + MFA Push Notification (Input a dynamic number and click “approve” at MS Authenticator App) | |
| 3. Use a verification code: Password + Input the MFA One-Time Passcode (OTP) shown at MS Authenticator App |
2. How to opt-in to passkey enablement?
You can click the opt-in website below to register your corresponding account and join the passkey registration campaign.
| Account Types | Passkey Opt-in Website |
|---|---|
| Staff | <will be available by end of Nov 2026> |
| Students | <will be available by end of Sept 2026> |
| Graduate | <will be available by end of Dec 2026> |
| Connect Graduate | <will be available by end of Sept 2026> |
After a successful opt-in registration, it may take up to two hours for your account to be enrolled in the passkey registration campaign. Once enrolled, and provided that you have the latest version of Microsoft Authenticator installed, then you may proceed with passkey registration procedures at next section.
If you have not yet installed or updated the Microsoft Authenticator App on your mobile phone, please follow these instructions to install Microsoft Authenticator App:
- iOS (at least iOS 17): App Store → search “Microsoft Authenticator App” → Install (or update)
- Android (at least Android 9): Google Play Store → search “Microsoft Authenticator App” → Install (or update)
If you have not yet sign-in the Microsoft Authenticator App, please follow these instructions sign in Microsoft Authenticator App
- Launch the app
- Tap “Add account” → “Work or school account”
- Enter your university email address (e.g., user@hku.hk)
- Complete sign-in using your existing password and any multi-factor authentication (MFA) prompt
3. How to create a passkey?
After an account is opt-in to the passkey registration campaign, then he/she can create at least one (or more) passkey to store it to Microsoft Authenticator App or other passkey provider storage locations.
3.1 How to create a passkey in Microsoft Authenticator App?
a. When your account is enrolled in or you have successfully opted in to the passkey registration campaign, please use your mobile phone device installed with the Microsoft Authenticator app to sign in to any Microsoft 365 service using your HKU account (e.g., UID@hku.hk or UID@connect.hku.hk). Microsoft 365 services include Exchange Online, Teams, OneDrive, and SharePoint Online. You should then see the “Let’s create your passkey” screen at your Microsoft Authenticator app. Click “Sign in” to begin the passkey registration process. If the “Let’s create your passkey” prompt does not appear, you may alternatively select “Create a passkey” directly from the Microsoft Authenticator app. After entering your password and completing MFA verification, you will see the “Let’s keep your account secure” screen. This indicates that your account is ready for passkey registration. Click “Next” to continue with the setup process. | 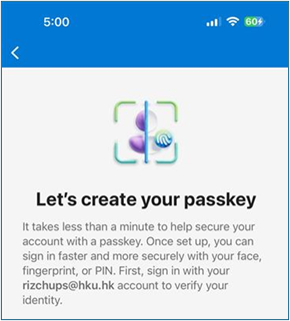 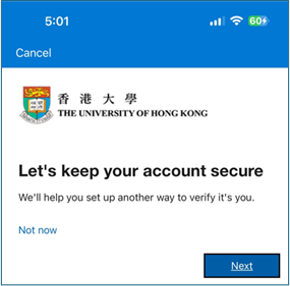 |
| b. At the next screen, you will see a sentence showing “Sign in faster with your face, fingerprint, or PIN”, click “Next” to continue. | 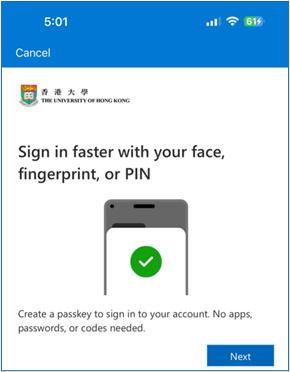 |
| c. At the next interface, you can give a name of this newly created passkey, e.g. “Passkey MFA App” and click “Next”. | 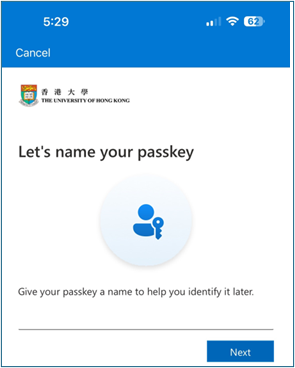 |
| d. If it prompts to choose “Save your passkey” location, then choose the passkey storage location to “Microsoft Authenticator” or “Passkey in Microsoft Authenticator”. | |
| e. If necessary, tap “Setting” at your mobile phone and setup a screen lock. | 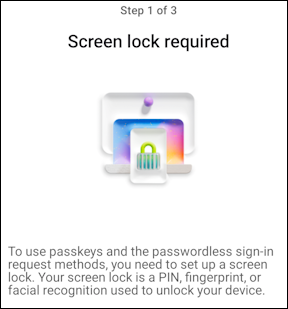 |
| f. Optionally, tap “settings” at your mobile phone to enable Microsoft Authenticator App as a passkey provider. | 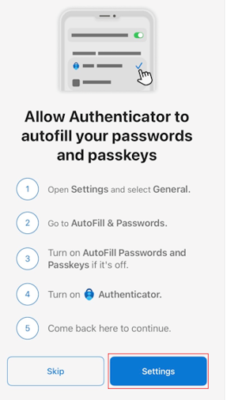 |
g. For iOS users: On your iOS 18 device (or later), go to Settings > General > Autofill & Passwords. On your iOS 17 device, go to Settings > Passwords > Password Options.
For Android users, in “Settings” open “Passwords & accounts” interface and search for “Additional providers” section, please make sure that Authenticator is selected.
| |
| h. Switch back to Microsoft Authenticator App interface. Then click “OK” again and you will see a Passkey created screen. Then if you tap to select your account name at Authenticator App interface. You can verify that a new passkey is now enabled at HKU accounts and stored in your Microsoft Authenticator App. Then the passkey creation process is completed. | 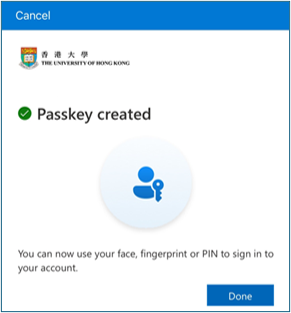 |
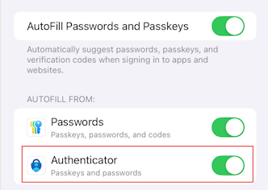
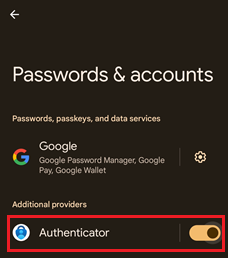
Other than the first primary passkey stored in Microsoft Authenticator App, you can also create other multiple secondary passkeys at other passkey providers, such as Apple iCloud Keychain (for Apple iOS users), Google Password Manager (for Google Android users) and Windows Hello (for Microsoft Windows users).
3.2 How to create another passkey at Apple iCloud Keychain?
(For Apple device users)
3.2.1 Prerequisites for saving passkey at Apple iCloud Keychain:
- iOS device running iOS v17 or later and signed in to iCloud account
- iCloud Keychain enabled: Settings → [Your Name] → iCloud → Passwords & Keychain → sync to ON
3.2.2 Create a Passkey for Entra ID with Apple iCloud Keychain:
- At the iOS device, visit the Entra ID login portal (e.g. https://aka.ms/mysecurityinfo/) with Safari or open other M365 app that supports passkeys.
- Enter your Entra ID (email) to begin sign-in with the primary passkey stored in Microsoft Authenticator App.
- After logging in your “security info page”, choose “Add a sign-in method” and then choose “Passkey”
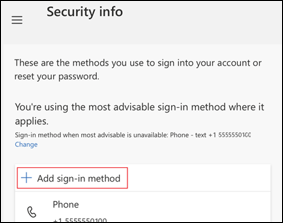
- Then select Create Passkey or Add Passkey and then select “iCloud Keychain”, or select “iPhone, iPad or Android device”.
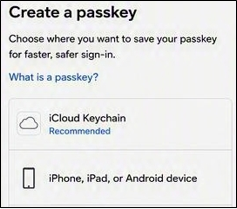
- Follow instructions: confirm biometric authentication (Face ID/Touch ID) or device passcode. At the next screen, it may prompt you give a name of this new passkey, e.g. “Passkey iCloud keychain” and click “Next”.
- When asked about the passkey saving location, approve it by saving the passkey to iCloud Keychain. Then this new created passkey is stored in your Apple iCloud Keychain.
3.2.3 When using the passkey with Apple iCloud Keychain:
- Next time you log into HKU SSO webpage or Entra ID, tap Use Passkey from the location of iCloud keychain.
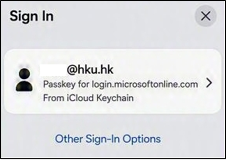
- Authenticate with Face ID/Touch ID.
- Your device will automatically use the stored passkey at iCloud Keychain for authentication.
3.3 How to create another passkey at Google Password Manager?
(For Google device users)
3.3.1 Prerequisites for saving passkey at Google Password Manager:
- Google account signed in on your Android device with Android version 14 or later
- Google Password Manager is installed by default
3.3.2 Create a Passkey for Entra ID with Google Password Manager:
- At the Android device, visit the Entra ID login portal (e.g. https://aka.ms/mysecurityinfo/) with Chrome browser or open other M365 app that supports passkeys.
- Enter your Entra ID (email) to begin sign-in.
- Sign-in with the primary passkey stored in Microsoft Authenticator App.
- After logging in your “security info page”, choose “Add a sign-in method” and then choose “Passkey”
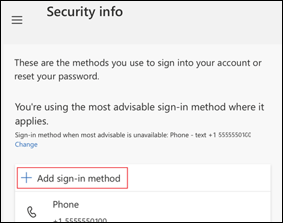
- When prompted to authenticate, select Create Passkey or Add Passkey option
- Complete authentication using biometric options (fingerprint, face recognition) or device PIN. At the next screen, it may prompt you give a name of this new passkey, e.g. “Passkey Google Password Manager” and click “Next”.
- When it prompts the passkey storage location, choose “Android device” → you’ll be prompted to use “Google Password Manager”
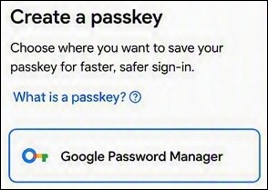
- Tap “Save passkey” and then Google Password Manager will securely store the passkey.
3.3.3 When using the passkey with Google Password Manager:
- On subsequent logins to Entra ID at the HKU SSO website, select to use Passkey from the location of “Google Password Manager”.
- Then authenticate Google Password Manager via biometric or device PIN.
- Your device will automatically use the stored passkey at Google Password Manager for authentication.
3.4 How to create another passkey at Windows Hello?
(For Windows physical device users)
3.4.1 Prerequisites for saving passkey at Windows Hello:
- At a Windows 11 device with latest Windows update, configure Windows Hello configured by Click the Start menu and select Settings
- Click on Accounts > Sign-in options
- Under Windows Hello, choose your preferred method:
- Fingerprint: Click Set up > follow on-screen instructions.
- Facial recognition: Click Set up > allow camera access and follow prompts.
- PIN: If not already set, click Add a PIN and create one.
3.4.2 Create a Passkey for Entra ID with Windows Hello:
- At the Windows 11 device, visit the Entra ID login portal (e.g. https://aka.ms/mysecurityinfo/) with edge browser that supports passkeys.
- Enter your Entra ID (email) to begin sign-in.
- Sign-in with the primary passkey stored in Microsoft Authenticator App.
- After logging in your “security info page”, choose “Add a sign-in method” and then choose “Passkey”
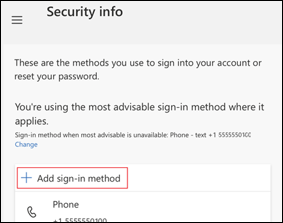
- When prompted to authenticate, select Create Passkey or Add Passkey option
- When asked to authenticate, Use “Windows Hello” biometric method (face, fingerprint) or PIN. At the next screen, it may prompt you give a name of this new passkey, e.g. “Passkey Windows Hello” and click “Next”.
- After confirm creation, and your system will generate the passkey stored in Windows Hello.
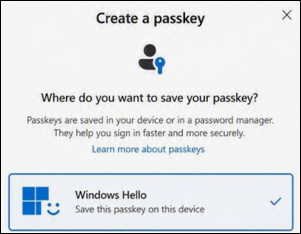
3.4.3 When using the passkey with Windows Hello:
- On subsequent logins to Entra ID at the HKU SSO website, select to sign-in with Windows Hello.
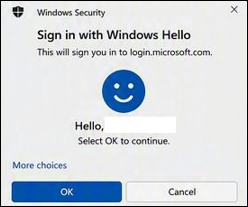
- Authenticate via biometric or device PIN.
- Your device will automatically use the stored passkey at Windows Hello for authentication.
4. How to sign-in with passkey to HKU SSO services?
Once your passkey is stored in Authenticator App, then you can use the passkey to sign in to HKU Single-Sign-On (SSO) enabled services without a password.
4.1 Sign in from the device that can access passkeys directly
- At the device that can access to your passkey, launch a browser (or compatible App) to visit Microsoft M365 webpage such as https://hkuportal.hku.hk/ or https://aka.ms/mysecurityinfo/
- Click “Sign in”
- Enter your login name with university email address (e.g. UID@hku.hk, or UID@connect.hku.hk)
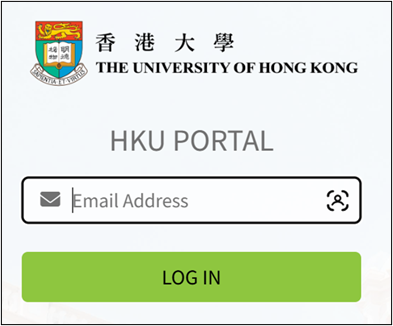
- On the next screen, it should default select passkey sign-in option: “Face, fingerprint, PIN or security key” with your HKU account, Click “Continue”
- A sign-in prompt appears on your device. If you are using a passkey stored in the Microsoft Authenticator app, the app will automatically launch and prompt you to verify your identity using biometrics (such as a fingerprint or facial recognition) or your device PIN.
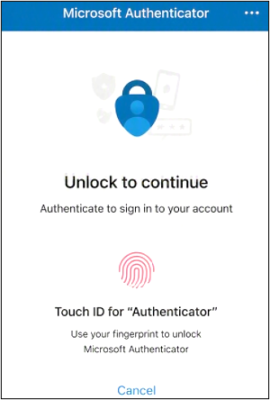
- After your device successfully authenticate biometric about your identity, then you are signed in to Microsoft M365 services – no password needed!
4.2 Sign in from a different device that have no passkeys
You can also sign-in with passkey from another different device that does not have direct access to your passkeys by following the below steps.
4.2.1 Prepare your smart phone and computer
- Turn on Bluetooth on both your computer and your smart phone that is installed with Microsoft Authenticator App and created with passkey (with procedure mentioned at the above section), and make sure they are paired and connected via Bluetooth.
- Keep your phone nearby (within Bluetooth range – about 10 metres).
- On the computer, open a browser and visit to HKU SSO webpages, e.g. http://hkuportal.hku.hk or any M365 app (Outlook, Teams, OneDrive).
4.2.2 Start the sign‑in process
- When sign-in HKU SSO websites on browser, Enter your login name with university email address (e.g. UID@hku.hk, UID@connect.hku.hk)
- Look for and select this option “Use another device” or “Sign in with a passkey from another device”.
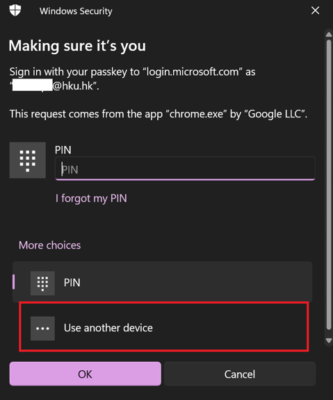
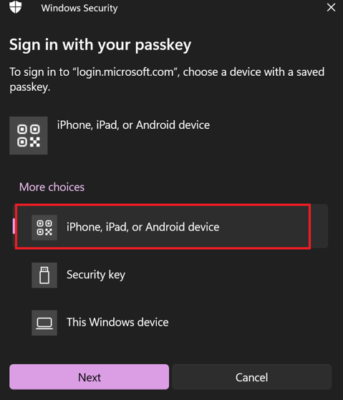
- Then the option to choose “iPhone, iPad or Android device”
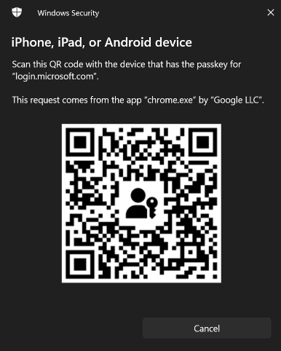
- The browser will now try to connect to your phone. A QR code appears on the computer screen.
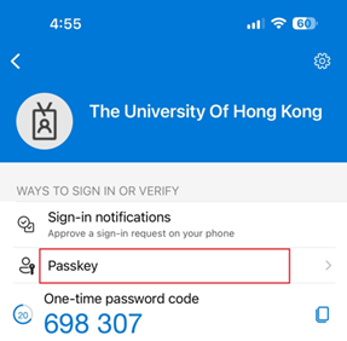
- On your smart phone (with Bluetooth connection with your computer), launch the Microsoft Authenticator App. Click to select your HKU account from the list.
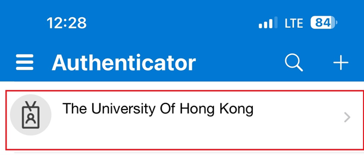
- And then select the passkey that you created earlier.
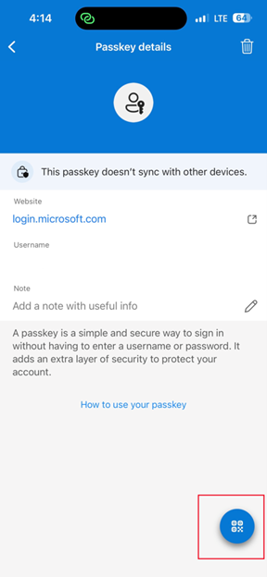
- Then tap the “Scan” icon in the bottom-right corner of the Microsoft Authenticator passkey screen.
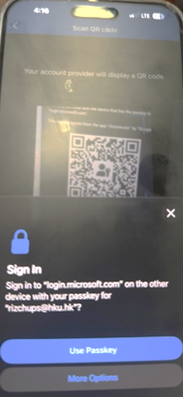
- Once the scanning QR code process is completed, the following screen will be displayed, then click “Use Passkey”
- Then the computer will immediately sign you in. Then the sign-in process completed.
5. How to handle if your passkey saved at Microsoft Authenticator App is lost?
In case if you lost your phone or the Authenticator App is malfunctioning and if you don’t have any other secondary passkey stored in other passkey provider storage, then you have to re-create a new passkey in the Microsoft Authenticator App, with these steps:
- Reinstall the Microsoft Authenticator App,
- Request for “Reset HKU MFA” and then authenticate to sign-into MFA again.
- After successful sign-in the Microsoft Authenticator App, then re-create a new passkey same as the original procedures mentioned above.
6. FAQ and troubleshooting passkey sign-in problems
| Sign-in Problem | Suggestion/Solution |
(a) When the application cannot read the passkey (e.g. sign-in at VPC environment for which passkey is not yet supported), it may appear to have following error:
| Click “Cancel” and then you can choose other sign-in ways such as “Approve a request on my Microsoft Authenticator app”
|
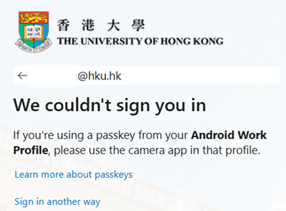
(b) When the application cannot read the passkey, it may appear to have following error:
| Click “Sign in another way”, then you can choose other way such as “Approve a request on my Microsoft Authenticator app”
|
| (c) Is there any conditional access policy for passkey? | There is no specific conditional access policy is applied to passkey sign-in. Once passkey authentication is enabled for your account, passkey becomes your default sign-in method regardless of whether you access HKU SSO websites from the campus network or over the Internet. |
| (d) Does the “remember me” or “Stay signed in?” still work when using passkey to sign-in? | Yes, the “remember me” or “Stay signed in?” option will keep being the same until the browser is closed or after cookie expires. |
| (e) Can I still use password with MFA authenticator app to sign-in? | Yes, Microsoft currently has no plans to disable Authenticator App related sign-in methods, including password sign-in with Microsoft Authenticator push notifications or sign-in using the 6-digit one-time passcode (OTP) generated by the Microsoft Authenticator app. |
| (f) What should I do to keep my passkey when I purchase a new smart phone? | When you purchase a new phone, use the Microsoft Authenticator app on your current device to sign in to the Microsoft Security Info page (https://aka.ms/mysecurityinfo/). Then add the Microsoft Authenticator app on your new phone and create a new passkey on the new device. |
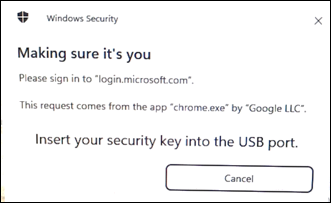
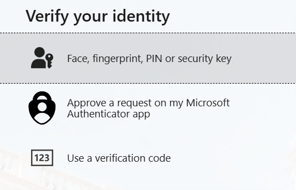
Remind that passkey is one of the default sign-in method to access HKU SSO services or Microsoft service with your HKU account, you can still choose “sign-in another way” to sign-in with password and Authenticator App Push Notification, or input the Authenticator App 6-digit One Time Passcode.
7. Additional Resources
- Microsoft official guide: Sign in with a passkey (https://learn.microsoft.com/en-us/entra/identity/authentication/how-to-register-passkey-authenticator?tabs=iOS )
- Microsoft Authenticator help: https://aka.ms/mysecurityinfo/
8. Contact ITS Support
If you need assistance with passkey recovery, please contact the University ITS Help Desk email: ithelp@hku.hk