Go to https://webmail.hku.hk and select GRADUATE.HKU.HK.

Users will be prompted to input the following information at first login:
- Display Name (Sender Name (information to display in the “From” field))
- Email (Default email address, non-editable)
- Signature (Your default “signature” to display at the email footer (OPTIONAL))

If you miss updating the identity information at first login, you can change it by following the steps in Section 5 – Identity Settings.
Below are some common icons of Roundcube:
| Symbols | Description |
|---|---|
| Email component | |
| Address book component | |
| Settings component | |
| Logout | |
| Check for new messages | |
| Compose a new message | |
| Reply | |
| Reply to all | |
| Forward message | |
| Delete message | |
| Mark message – you can mark message as read, unread, flagged or unflagged | |
| More actions – you can perform actions on the selected message, which include Print this message, Download (.eml), Edit as new, Show source and Open in new window | |
| Filter – you can filter message by different options, which include Unread, Flagged, Unanswered, Deleted, Not deleted and Priority | |
Search message – Pre-defined keywords are available for searching, which include from, to, cc, subject and body. Example: If the pre-defined keyword is not specified, the system will search the searching criteria from mail subjects and headers only. | |
| Folder actions – Manager folder, Compact or Empty folders | |
| Check the box to show the preview pane, which let you preview messages without double clicking the mail subject | |
| Send messages | |
| Attach a file | |
| Insert signature | |
| Save as draft | |
| Message options – Return receipt, Delivery status notification, Priority and Save sent message in… |
- Click Settings button.
- Click Identities tab.
- Select the identity from the left pane.
- You can update the following information under the Edit Item pane:
- Display Name – Sender Name (information to display in the “From” field)
- Organization – e.g. Department Name
- Reply-To – For setting up a Reply-To email address which is not the same as the default sender email address as listed in the Email field
- Bcc – For setting up a default Bcc email address
- Set Default – Check this option to set an identity as default
- Signature – Click the Signature tab to edit(Note: Email field is non-editable.)
- Click Save button to save the settings.

The folder list can be found in the Folders pane.
In case some folders are missing from the Folders pane, you can subscribe by the following steps:
- Click Settings button.
- Select Folders tab.
- Check the box next to the folder name that you wish to subscribe.
- Click Mail button to return to the mail interface.

- The subscribed folders will be included in the Folders pane on the left.

- Click
 button at the bottom left of the Folders pane.
 - Fill in Folder name.
- Click Save button.(Note: Creation of sub-folder is NOT supported)

- Select a folder from the Folders pane on the left.
- Change the Folder name or List view mode under the Folders properties pane.
- Click Save to apply the change.

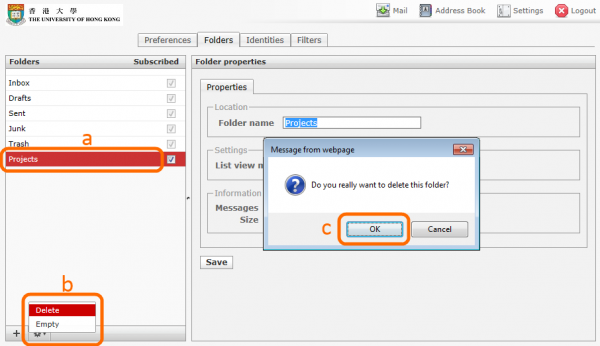
- Select the folder you want to delete from the Folders pane on the left.
- Click
 button and select Delete.
 - If you confirm to delete the folder, click OK in the dialog box; otherwise click Cancel.
The deleted folder including messages in it will be deleted immediately without sending to Trash folder and cannot be restored from the Trash folder. Please ensure you have selected the folder you wish to delete before you click OK.
To preview message(s) in the preview pane, you can check the ![]() box. Otherwise, you have to double click the mail subject to open the message.
box. Otherwise, you have to double click the mail subject to open the message.
You can change the List options by clicking the ![]() button. Then, you can change the following settings from the option pane:
button. Then, you can change the following settings from the option pane:
- List view mode
- List columns
- Sorting column
- Sorting order

If you want to apply action (delete, copy or move) to multiple messages, you can select multiple messages by holding Ctrl/Shift key on your keyboard.
To select a consecutive group of files or folders, you can click the first item, press the SHIFT key, and click the last item.
To select non-consecutive files or folders, you can press the CTRL key, and click on each item you want to select.
You can also use the following Select buttons to select messages.

To delete message(s), select the message(s) you want to delete and click the ![]() button. Or you can right click the selected message(s) and select Delete message from the right-click menu.
button. Or you can right click the selected message(s) and select Delete message from the right-click menu.
By default, the deleted message(s) will be moved to the Trash folder. If you want to mark the message as deleted instead of move to it to the Trash folder, you can apply the following steps:
- Click Settings button.
- Select Server Settings from Selection pane on the left.
- Check the Flag the message for deletion instead of delete box under the Main Options section.
- Click Save button.

- After applied the above setting, the deleted message will be displayed in gray color with
 icon. You can click the icon to undelete the message.
- Select Trash folder from the Folders pane on the left.
- Click button at the bottom of the Folders pane and select Empty; or
- Right click the selected folder and select Empty.

- Select the folder that contains messages marked as deleted (e.g. the INBOX folder).
- Click button at the bottom of the Folders pane and select Compact; or
- Right click the selected folder and select Compact.

- Right click your selected message(s).
- Point to Move to… or Copy to… and select your target folder, or
- Drag and drop the selected message(s) to the destination folder.

Click the ![]() button to compose a new message.
button to compose a new message.
Click the ![]() button and browse for a file to create a attachment. You can also drag and drop a file from your explorer to the Attachments pane.
button and browse for a file to create a attachment. You can also drag and drop a file from your explorer to the Attachments pane.
(Note: Internet Explorer (IE) 9 and older versions do not support the drag and drop function. You have to use the latest browser to use this function.)
By default, while you are composing message, the webmail will save the draft automatically in every 5 minutes. You can change this setting by clicking Settings -> Composing Messages -> Automatically save draft.
You can also save draft manually by clicking the ![]() button.
button.
By default, your draft message(s) will be saved to the Drafts folder, and outgoing message(s) will be saved to the Sent folder.
The following shows the major functions for composing and sending messages:

You can click the following buttons to reply, reply all or forward message while you are reading a mail.
| Symbols | Description |
|---|---|
| Reply | |
| Reply to all | |
| Forward message |
| Symbols | Description |
|---|---|
| Create new contact | |
| Compose mail to the selected contact(s) | |
| Delete the selected contact(s) | |
| Import contacts | |
| Export contacts in vCard format | |
| Advanced search contacts | |
| Search contacts |
Click ![]() buttons to create a new contact. Click Save after complete.
buttons to create a new contact. Click Save after complete.

Select a contact from Contacts pane on the left. Click Edit contact button to edit, and then click Save button.

You can import contacts to the new Roundcube webmail address book manually by clicking Address Book -> ![]() icon.
icon.
The address book accepts contact data in CSV or vCard format. Non-ASCII characters should be in UTF-8 encoding.
Example of CSV columns and field names is as follows:
Display Name,E-mail Address,Home Address,Work Address,Home Phone,Work Phone,Mobile Phone,Fax Number,Job Title,Organization,Notes,Last Name
Chan Tai Man,chantaiman@hku.hk,999 Water Street ,RR HKU,22222222,33333333,99999999,66666666,Professor,HKU,My notes,Chan
You can export contacts from the new Roundcube webmail address book manually by clicking Address Book -> ![]() icon.
icon.
The exported file will be in vCard format.
- Click button at the bottom left of the Groups pane.
- Fill-in the new group name and press Enter.

When composing a new mail, click Personal Addresses from the Contacts pane on the left. Select the group that you want the email to send to, and then click the To >> or Cc >> or Bcc >> button at the bottom of the Contacts pane. All email addresses belong to the selected group will be added as the mail recipients.
The Cc and Bcc fields are hidden by default. To use these fields, you can click Add Cc or Add Bcc.

Filtering rules created in the old IMP webmail will NOT be migrated to the new Roundcube webmail. Filtering rules can be set up by the following steps:
- Click Settings button.
- Select Filters tab.
- Fill in the following fields and click Save button.

- After saving, the rule will be displayed in the Stored filters section.

- Click Delete if you want to remove the filtering rule.
- Filtering rules set up are not editable. To change the setup of a filtering rule, please delete the original rule and setup a new one.
If you want to filter SPAM emails or unwanted emails which send from known sender addresses or domains, it is recommended to setup safelist/blocklist on IronPort Spam Quarantine.
In the webmail interface, you can select a mail and click the gear button, then select Download (.eml) to download the message and save to local computer. The “.eml” format file can be opened by many email client programs, e.g. Outlook, Windows Live Mail, Apple Mail or Thunderbird.

The error “errorroverquota” indicates your disk quota is full.
![]()
Please refer to the procedure here on how to delete mails without saving them in the Trash folder.
You can delete mail without saving them to Trash folder as follows:
“Settings” -> “Preference” tab -> “Server Settings” -> “Main Options” -> check Flag the message for deletion instead of delete -> Save

After applying the above setting, your deleted message will be marked deleted. Deleted messages will be displayed in grey color with ![]() icon. You can click the
icon. You can click the ![]() icon to undelete a message.
icon to undelete a message.
To purge deleted messages, you can check the option “Compact Inbox on logout” so that the system will automatically purge the deleted messages when you logout. Beisdes, if you want to purge deleted messages manually, you can perform one of the following actions:
- Click
 button at the left bottom corner and select Compact; or
 - Right click the selected folder, select Compact.

Please keep the Trash folder empty or compact deleted message regularly to prevent your mailbox getting full. By default, there is no automatic purging of deleted messages.
n the webmail composition screen, tick the ![]() button, check the box Return receipt. If this email is opened with an email client (e.g. Outlook) the system will prompt the receiver to acknowledge the receipt of this email. However, the webmail system does not have the function to acknowledge the receipt of an email.
button, check the box Return receipt. If this email is opened with an email client (e.g. Outlook) the system will prompt the receiver to acknowledge the receipt of this email. However, the webmail system does not have the function to acknowledge the receipt of an email.

You can setup the email alias in “Settings” -> “Identities” -> Select your identity, and then enter your email alias in Reply-to address field.

If you would like to filter SPAM mails or unwanted emails which send from known sender addresses or domains, it is recommended to setup Blocklist on IronPort Spam Quarantine.
User Guide on IronPort Spam Quarantine
https://its.hku.hk/kb/user-guide-on-ironport-spam-quarantine/
If you find some of your mail folders are missing in the webmail interface, please refer to the procedure in Folder Subscription & Management under the Webmail User Guide to subscribe your mail folders.
After you open a mail message, click the bar between the date and message body as the following, then the full message header will be displayed.


If you see the error message “Server Error: Unable to send command: A0007 FETCH 1:* (UID BODY.PEEK[HEADER.FIELDS (SUBJECT)])”, please re-sort message by date, click Date column, the messages will appear again.

Method 1:
You can click “Forward as attachment” as shown below. The original message will be forwarded as an attachment in a new message.

Method 2:
You can apply the following settings to forward the message in HTML format:
“Settings” -> “Preferences” tab -> “Composing Messages” -> “Compose HTML messages” -> Select “on forward or reply to HTML message” under “Compose HTML messages” and save.

- Deleted messages will be moved to the Trash folder by default. If the disk quota of your mailbox exceeds, you won’t be able to move the deleted messages to the Trash folder and you need to delete your emails without saving them to the Trash folder. Please refer to FAQ on How can I delete mails without saving them to Trash folder?.
- Please clear your Trash folder regularly to free up storage space. You can click the procedure on Deleting Messages for details. You can also download a copy of an email before deletion. If you want to keep a copy at your local PC, please refer to the FAQ on How to download a mail message in eml format?.
- You can check the disk quota usage via the link at https://its.hku.hk/kb/check-disk-quota/ which will show the size of your account or email folders in use.
When you are writing a mail, you may click the gear button, select – don’t save- from the put down menu next to Save sent message in:.

If you want to make this effective for all outgoing message in the future, please go to Settings -> Preferences -> Special Folders , set Sent as “—” and Save. All the outgoing mail will not be save a copy to Sent folder.

In order to protect HKU users from session hijacking, your session will be expired once your IP address changed. If it always happen after you login with valid user name and password, that means you network environment cannot provide a static source IP for you to access the Internet. For HKU staff/students, you may login HKUVPN first and access the webmail. If you are not HKU staff/student, please consult your network administrator to provide you a static IP address to access the Internet.
User Guide on Remote Access via HKUVPN (Virtual Private Network):
https://its.hku.hk/kb/hkuvpn-connection-with-2fa/

You may encounter email display problem in webmail account when your web browser stored too many temporary data (e.g. browsing history, cookies or cache, etc.). You may try login using another web browser or resetting your current browser to its default condition.
Resetting web browser may remove your browser and personal settings. Please refer to https://its.hku.hk/kb/delete-your-browsing-history/ to delete browser cache procedure